Editor Screen Overview
First, you should familiarize yourself with the editor screen. At the bottom of the screen, you find the main toolbar (see Fig. 1). Depending on the size of your device, there may be less or even more icons than shown than in Fig. 1. The functions of the icons that did not fit into the toolbar can be found in the overflow menu at the right side (6).
The buttons have the following function:
| Add a new measure. The tools menu (Fig. 2) will show to let you choose what kind of element to add. The right half of the button shows the tool that you added previously. You can use this to quickly add several elements of the same kind without having to open the tools menu each time. A few tools that are usually only used once (e.g. a perspective reference) will not be shown on the right side. | |
| Change the color of the selected measure. When no measure is selected, it will change the default color. I.e. the initial color that a new element receives. | |
| Style options for the currently selected measure. Opens a dialog in which you can set a multitude of options that affect the appearance of the active element, like line width, font size, position of labels, drawing shapes, etc. | |
| Delete the selected element. | |
| Locks the selected measure from accidental modification. When locked, a measure cannot be moved anymore, but you can still change its attributes like color or styling. The shape of this icon shows whether the measure is currently locked or unlocked. | |
| Undo and redo of last editing operations. | |
| A measure can be either in manual mode or attached to a reference based on which its value is automatically computed. If you add a new measure to the image when there already is a reference present, it is automatically attached to the reference. If you add the reference after the element, the elements are not automatically attached. In this case, you can use this icon to attach the element to the reference and compute the measure. You can use the second icon to detach it again from the reference and enter its value manually instead of using the computed value. | |
| Rotate the image by 90 degrees. | |
| Overflow menu containing the less frequently used functions whose icons did not fit into the toolbar, like Undo, or Image rotation. |

Measuring and Drawing Tools
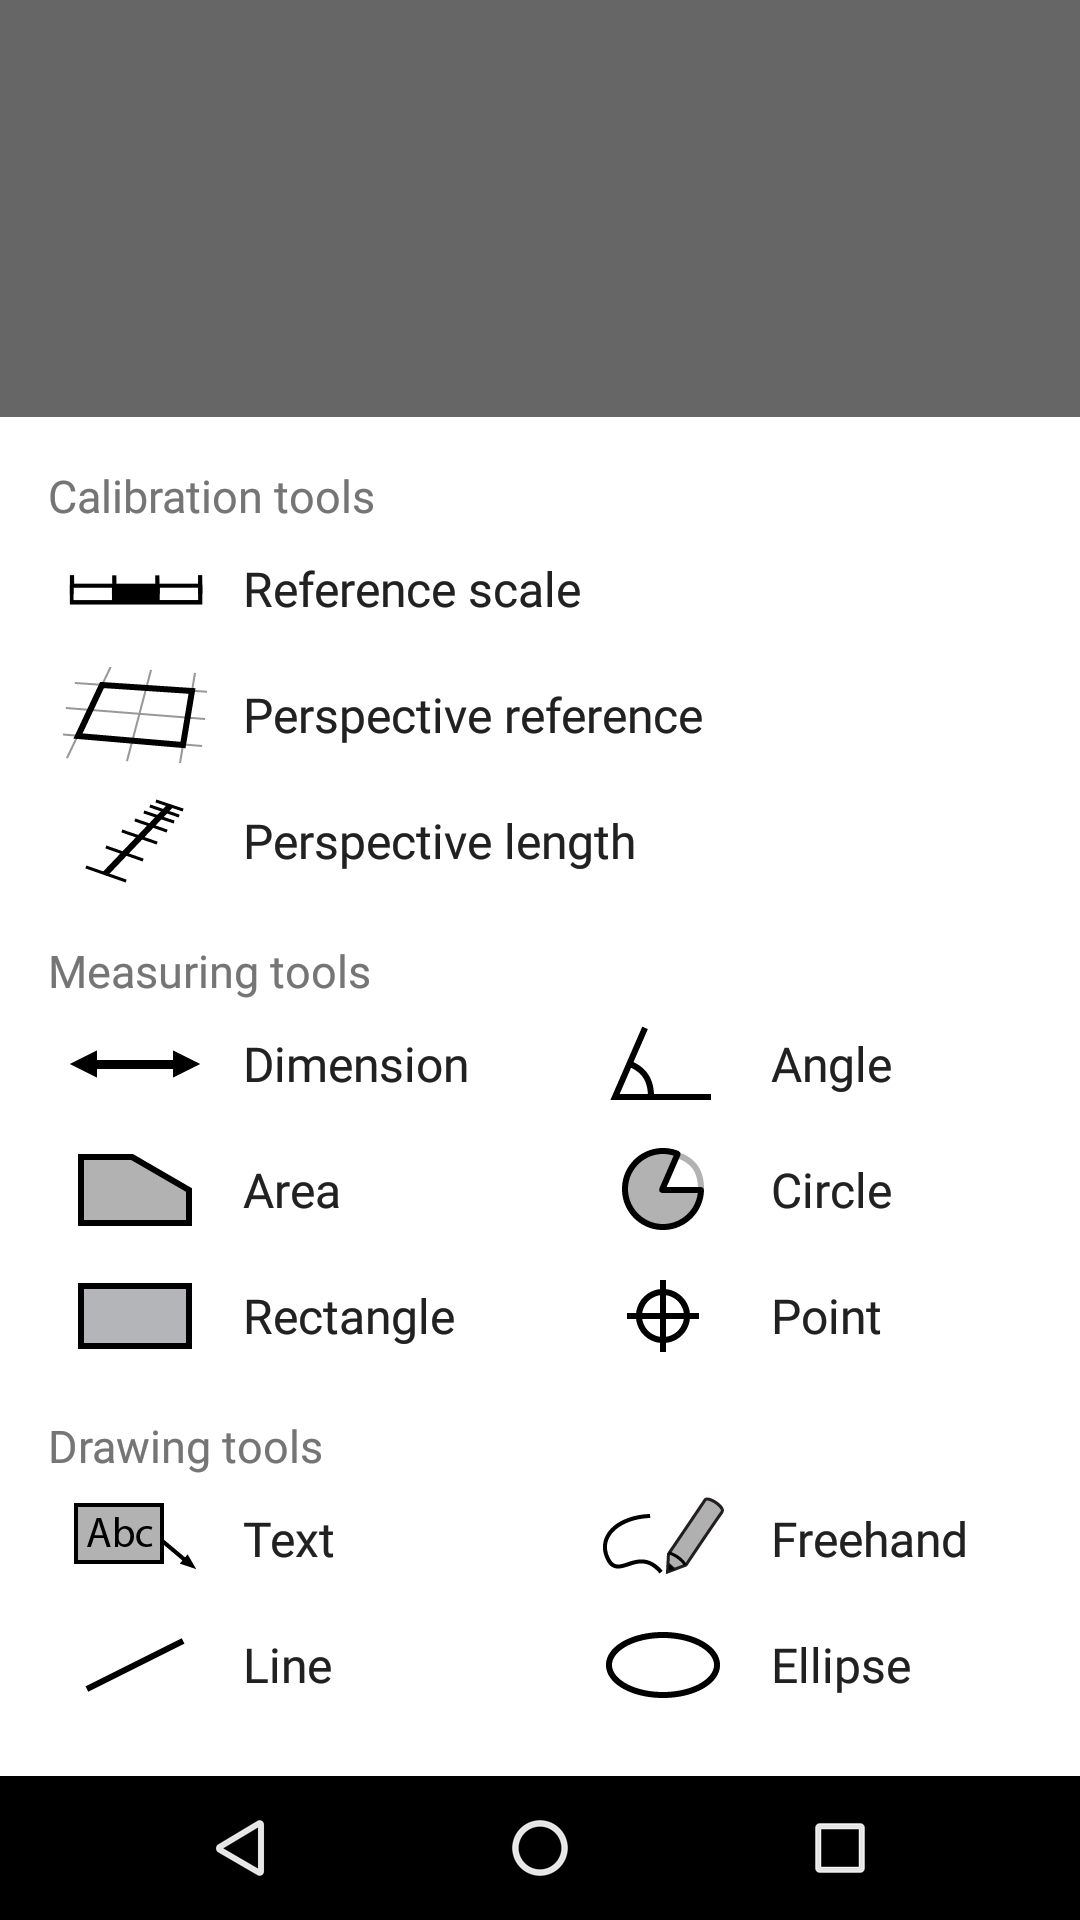
When pressing on the Add New button (Fig. 1, Button 1), you can select which kind of element you want to draw (Fig. 2). The drawing tools are categorized into three classes:- Calibration tools for providing reference measurements that allow ImageMeter to compute further dimensions automatically,
- Measuring tools for adding measures to the image. The actual dimensions for these measure can be either entered manually, via a Bluetooth laser distance meter, or they can be automatically computed, when a reference measurement has been provided with one of the calibration tools.
- Drawing tools are for adding additional text, notes, or drawings that are no measures.
Calibration Tools
The tools have the following functions:
| The Reference Scale provides a scaling calibration that can be used for 2D drawings or photos that are perfectly fronto-parallel (no perspective foreshortening). You can use this for maps, floor-plans, scanned images, and for photos when you take care that the object is not tilted with respect to the camera. | |
| The Perspective Reference can be used for measuring on a plane that is captured at an angle and shows perspective distortion. You can use this calibration method whenever you want to measure something on a flat plane. For example, you may take the image of a wall, specify the wall size with the Perspective Reference and then measure anything on that wall automatically. | |
| The Perspective Length tool is a bit special in that it does not provide a reference for the other measure tools. Its purpose is to measure the height or length of single objects that are, for example, too high to measure directly. You can use this tool to compute the total length of something if you know two distances on it. As an example, you can get a tree height from a photo if you know, e.g., two positions which are 1 meter and 2 meters above the ground, respectively. The tool takes care about the perspective distortions. |
Measuring Tools
| Length measurement. | |
| Angle measurement. | |
| Area measurement. The area can be of arbitrary shape (without holes). Additionally to the area, you can also enable the computation of all edge lengths and the total perimeter. | |
| Circle measurement. You specify the circle by three points on its boundary. ImageMeter computes the radius, diameter, circumference, and area. You can also specify a circle segments (double click on the circle boundary to toggle segments). Area and circumference will then be based on the circle segment only. | |
| Rectangle measurement. Computes area, perimeter, and the side lengths. The advantage of using the Rectangle tool instead of the Area tool is that it is easier too adjust the rectangle sizes, rotate it, and move the whole rectangle. Clearly, ImageMeter also makes sure that the opposing sides are really parallel. | |
| Measurement points that can be used for arbitrary measurements related to a specific point, like that point's height above ground. The values for this tool are not computed automatically. |
Drawing Tools
| Add a text box with arrows. The box can have an arbitrary number of arrows (or none) and it can be rotated. You can define a number of predefined texts that can then be easily selected without having to type it in every time. | |
| Freehand drawing. You can draw several strokes that are then grouped together. You can translate, rotate, and resize each stroke independently and also assign a color and line width to each stroke individually. Still, you can move the whole group of strokes as one object. | |
| Draw lines. Different line patterns, line endings, and more styling options are available. | |
| Draw ellipses that also can be rotated. |